How to Drastically Speed Up Your WordPress REST API: A Comprehensive Guide

The WordPress REST API is a powerful interface for building decoupled applications, mobile apps, and integrating third-party systems. However, if it’s sluggish, your entire project’s performance and user experience can suffer. In this comprehensive guide, we’ll cover actionable tips and code examples—from server tuning to intelligent caching—to make your WordPress REST API lightning fast.

Understanding REST API Performance Bottlenecks

Before implementing optimizations, it’s essential to identify common bottlenecks that can hinder API response times:

  1. Database Queries: Unindexed or complex queries slow down responses.
  2. Plugin Overhead: Bloated or poorly coded plugins introduce unnecessary load.
  3. Server Configuration: Inefficient PHP or web server settings degrade performance.
  4. Network Latency: Geographic distance between client and server increases response time.
  5. Response Size: Returning excessive or unfiltered data inflates payloads.
  6. Authentication Logic: Heavy or redundant authentication steps for each request.

Server-Level Optimizations

1. Upgrade Your PHP Version

Newer PHP versions offer significant performance improvements. Always use the latest stable version (PHP 8.2 or newer):

  • PHP 8.2: Up to 18% faster than 7.4
  • PHP 8.3: Additional performance gains of 5–10%

2. Implement Persistent Object Caching (e.g., Redis)

Add Redis support to cache database queries and objects in memory:

// wp-config.php
define('WP_REDIS_HOST', '127.0.0.1');
define('WP_REDIS_PORT', 6379);
define('WP_REDIS_TIMEOUT', 1);
define('WP_REDIS_READ_TIMEOUT', 1);

3. Configure OPcache

OPcache stores precompiled PHP scripts in memory:

opcache.enable=1
opcache.memory_consumption=128
opcache.max_accelerated_files=10000
opcache.revalidate_freq=60

4. Enable Gzip or Brotli Compression

Reduce payload size by enabling compression in your web server config:

<IfModule mod_deflate.c>
    AddOutputFilterByType DEFLATE application/json
</IfModule>

5. Use a Fast Web Server

Consider switching to Nginx or LiteSpeed for high-concurrency support and faster static content delivery.

WordPress-Specific Tweaks

1. Disable Unused REST API Endpoints

Clean up the endpoint list to reduce surface area and execution overhead:

add_filter('rest_endpoints', function($endpoints) {
    unset($endpoints['/wp/v2/users']);
    unset($endpoints['/wp/v2/comments']);
    return $endpoints;
});

2. Optimize REST API Request Parameters

Reduce payload by specifying only needed fields:

?_fields=id,title.rendered&per_page=10&context=view

3. Restrict Access for Unauthenticated Users

Prevent anonymous users from overloading your API:

add_filter('rest_authentication_errors', function($result) {
    if (!empty($result)) return $result;
    if (!is_user_logged_in()) {
        return new WP_Error('rest_not_logged_in', 'You are not logged in.', array('status' => 401));
    }
    return $result;
});

Advanced Caching Strategies

1. Use Transients for Short-Term Caching

Cache commonly requested results:

function get_cached_posts() {
    $cache_key = 'rest_api_posts_cache';
    $data = get_transient($cache_key);

    if (false === $data) {
        $data = new WP_Query(array(
            'posts_per_page' => 10,
            'fields' => 'ids'
        ));
        set_transient($cache_key, $data, 12 * HOUR_IN_SECONDS);
    }

    return $data;
}

2. Set HTTP Cache Headers

Allow clients or CDNs to cache REST responses:

add_filter('rest_post_dispatch', function($response) {
    $response->header('Cache-Control', 'public, max-age=3600');
    return $response;
});

3. Use Edge Caching (CDN)

Use services like Cloudflare or Fastly to cache API responses at edge locations for global speed.

Database Optimization

1. Regularly Optimize Tables

global $wpdb;
$wpdb->query("OPTIMIZE TABLE {$wpdb->posts}, {$wpdb->postmeta}");

2. Add Missing Indexes

Speeds up meta queries:

$wpdb->query("ALTER TABLE {$wpdb->postmeta} ADD INDEX meta_key_index (meta_key)");

3. Clean Up Post Revisions & Expired Transients

Use WP-CLI or plugins like WP-Sweep to remove unnecessary records.

Monitoring and Maintenance

1. Use Debugging Tools

Query Monitor helps trace slow REST queries and hooks.

2. Monitor Performance

Keep track of API health and latency using tools like:

  • New Relic APM
  • Blackfire.io
  • Lighthouse CI
  • Pingdom or UptimeRobot

3. Set Up Logging

Log REST request frequency, response time, and errors using custom logging or a plugin like WP Activity Log.

Plugins That Can Help

  • WP REST Cache: Caches REST API responses intelligently.
  • Redis Object Cache: Adds object caching using Redis.
  • Query Monitor: Debugs performance bottlenecks in real-time.
  • WP Rocket: Offers REST API and page cache optimization.
  • Perfmatters: Allows disabling REST API and unnecessary WordPress features.

Final Thoughts

Speeding up your WordPress REST API isn’t just about one quick fix—it’s a combination of clean code, smart caching, server optimization, and ongoing monitoring. Start by identifying bottlenecks, address low-hanging fruit (like PHP version and object caching), and gradually implement more advanced strategies like CDN edge caching and transient-based responses.

Fast APIs mean faster apps, better user experience, and more scalable infrastructure. Whether you’re building a headless frontend, mobile app, or integrating with external systems, optimizing your WordPress REST API is no longer optional—it’s essential.

Supercharge Your WordPress Reviews with CBX Multi Criteria Rating & Review Pro!

Are you looking to enhance the review system on your WordPress website? Do you want to provide your visitors with more detailed and insightful feedback? Look no further! The CBX Multi Criteria Rating & Review plugin, available on the WordPress plugin directory, is here to revolutionize how your users interact with your content.

And if you want to unlock the full potential of this powerful tool, the CBX Multi Criteria Rating & Review Pro addon is your ultimate solution.

Why Choose CBX Multi Criteria Rating & Review?

The free version of our plugin offers a solid foundation for multi-criteria reviews. It allows users to rate your products, services, or content based on specific criteria, providing a more nuanced and comprehensive evaluation than a simple star rating.

Here’s what the free version offers:

  • Multi-Criteria Rating: Allow users to rate based on various aspects.
  • User-Friendly Interface: Easy to use for both administrators and users.
  • Customizable Criteria: Define your own rating criteria.
  • Basic Review Display: Show reviews in a clear and organized manner.

But if you want to take your review system to the next level, the Pro addon is essential.

Unlock the Power of CBX Multi Criteria Rating & Review Pro

The Pro addon expands the functionality of the free plugin, providing a wealth of advanced features that will significantly enhance your review system.

Key Features of the Pro Addon:

  • Advanced Review Filtering and Sorting: Allow users to filter reviews by criteria, rating, and more.
  • Image and Video Uploads: Enable users to add visual content to their reviews.
  • Review Voting (Upvotes/Downvotes): Let users vote on helpful reviews.
  • Rich Snippets Support: Improve your SEO with structured data for reviews.
  • Detailed Review Statistics: Gain insights into your reviews with comprehensive analytics.
  • Customizable Review Forms: Tailor the review form to your specific needs.
  • Email Notifications: Receive notifications for new reviews.
  • Review Approval System: Moderate reviews before they are published.
  • Shortcode and Widget Support: Display reviews anywhere on your site.
  • Advanced Design Customization: Match the review system to your website’s design.
  • WooCommerce Integration: Integrate seamlessly with WooCommerce product reviews.
  • Priority Support: Get fast and reliable support from our team.

CBX Multi Criteria Rating & Review Pro Screenshot

Imagine being able to filter reviews based on specific criteria, allowing potential customers to quickly find the information they need. Or enabling users to upload images and videos, providing visual proof of their experiences. With the Pro addon, these features and many more are at your fingertips.

Why Upgrade to Pro?

Upgrading to the Pro addon offers numerous benefits:

  • Increased User Engagement: More detailed and interactive reviews keep users engaged.
  • Improved SEO: Rich snippets and structured data improve your search engine rankings.
  • Enhanced Trust and Credibility: Detailed reviews and visual content build trust with your audience.
  • Better Decision-Making: Users can make informed decisions based on comprehensive reviews.
  • Streamlined Review Management: Advanced moderation and analytics tools save you time and effort.

Don’t miss out on the opportunity to transform your WordPress review system. Upgrade to CBX Multi Criteria Rating & Review Pro today!

Get CBX Multi Criteria Rating & Review Pro Now!

If you have any questions or need assistance, please don’t hesitate to contact our support team.

Thank you for choosing CBX Multi Criteria Rating & Review!

Category Post Count in WordPress (Custom Taxonomy with Custom Post Type)

Let me explain my need in short:

I want to show post count for any category/any custom taxonomy registered for any custom post type. I searched wordpress forums and in google, found some solutions using

Nothing helped me such way, so I managed my own way with my little knowledge.

wp_get_productcat_postcount($id, $posttype = ‘product’, $taxname = ‘product_cat’)

$id = category or any taxonomy id(term id)
$posttype = post type name, example: post, page, or any custom post type
$taxname = taxonomy name or any category type name, for joomla default taxonomy it will category, post_tag, nav_menu, link_category, post_format, but we can use any custom taxonomy name as I used ‘product_cat’ which is used with custom post type ‘product’ , post type name.

[code lang=”php”]
function wp_get_productcat_postcount($id, $posttype = ‘product’, $taxname = ‘product_cat’) {

$result = wp_cache_get( ‘taxpostcount’.$id, ‘cbtaxpostcount’ );
//var_dump($resul);

if ( false === $result ) {

$args = array(
‘post_type’ => $posttype,
‘post_status’ => ‘publish’,
‘posts_per_page’ => -1,
‘tax_query’ => array(
‘relation’ => ‘AND’,
array(
‘taxonomy’ => $taxname,
‘field’ => ‘id’,
‘terms’ => array( $id )
)
)
);

$query = new WP_Query( $args);
/*
echo ‘<pre>’;

print_r($query->post_count);
echo ‘</pre>’;
*/
$result = (int)$query->post_count;

$cacheresult = wp_cache_set( ‘taxpostcount’.$id, $result, ‘cbtaxpostcount’ );
//var_dump($cacheresult);
}
return $result;
}
[/code]

Note: As I used wordpress object cache for better performance.

Thanks for reading, any comment is appreciable.

আসুন ওয়ার্ডপ্রেসের ড্যাশ বোর্ড পরিস্কার করি

ওয়ার্ডপ্রেসের এডমিন প্যানেলে লগিন করলেই একগাদা বক্স এসে হাজির হয়। যদিও স্ক্রিন অপশন থেকে সেগুলো সহজে তাড়ানো যায় কিন্তু যদি এমন হয় এডমিন নিজেই ড্যাশবোর্ড পরিস্কার করে রেখে দিলেন নতুন সদস্যের জন্য। তবে এই পরিস্কার এর কাজটা আমরা করবো সামান্য কিছু পিএইচপি কোডিং করে।

ধাপ একঃ প্রথমে আপনার থীমের functions.php ফাইলে এ ২টি ফাংশন লিখতে হবে। মনে রাখবেন প্লাগিন এর কোডগুলো চাইলে functions.php ফাইলেও লেখা যায়। তাহলে শুরু করা যাকঃ
[code language=”php”]
//Define the function which unsets the boxes
function remove_dashboard_widgets() {
global $wp_meta_boxes;
myprint_r($wp_meta_boxes);
/*
//unset($wp_meta_boxes[‘dashboard’][‘normal’][‘core’][‘dashboard_right_now’]);
# Remove plugins feed
unset($wp_meta_boxes[‘dashboard’][‘normal’][‘core’][‘dashboard_plugins’]);
unset($wp_meta_boxes[‘dashboard’][‘side’][‘core’][‘dashboard_plugins’]);
# Remove "WordPress News"
unset($wp_meta_boxes[‘dashboard’][‘normal’][‘core’][‘dashboard_primary’]);
unset($wp_meta_boxes[‘dashboard’][‘side’][‘core’][‘dashboard_primary’]);
unset($wp_meta_boxes[‘dashboard’][‘normal’][‘core’][‘dashboard_secondary’]);
unset($wp_meta_boxes[‘dashboard’][‘side’][‘core’][‘dashboard_secondary’]);
# Remove incoming links feed
unset($wp_meta_boxes[‘dashboard’][‘normal’][‘core’][‘dashboard_incoming_links’]);
unset($wp_meta_boxes[‘dashboard’][‘side’][‘core’][‘dashboard_incoming_links’]);

unset($wp_meta_boxes[‘dashboard’][‘side’][‘core’][‘dashboard_recent_drafts’]);
unset($wp_meta_boxes[‘dashboard’][‘normal’][‘core’][‘dashboard_recent_comments’]);
unset($wp_meta_boxes[‘dashboard’][‘side’][‘core’][‘dashboard_quick_press’]);
unset($wp_meta_boxes[‘dashboard’][‘normal’][‘core’][‘events_dashboard_window’]);
*/
}
// Now hook in to the action
add_action(‘wp_dashboard_setup’, ‘remove_dashboard_widgets’, 20, 0);

//better print_r function taken from
//http://stackoverflow.com/questions/1386331/php-print-r-nice-table
function myprint_r($my_array) {
if (is_array($my_array)) {
echo "<table border=1 cellspacing=0 cellpadding=3 width=100%>";
echo ‘<tr><td colspan=2 style="background-color:#333333;"><strong><font color=white>ARRAY</font></strong></td></tr>’;
foreach ($my_array as $k => $v) {
echo ‘<tr><td valign="top" style="width:40px;background-color:#F0F0F0;">’;
echo ‘<strong>’ . $k . "</strong></td><td>";
myprint_r($v);
echo "</td></tr>";
}
echo "</table>";
return;
}
echo $my_array;
}

[/code]
Continue reading

How to Insert custom Quicktags into the WordPress Editor

WordPress has two type of editor, one is visual/wysiwyw that is tinymce or replace with other such editors and another is HTML editor that is we call quick tag editor. Today, I want to write something about how to add custom quick tags or custom buttons. I search about it in google and most guides to edit core quick tag javascript file. But I don’t like that and I made my own hack in my own way, though experts may think it’s childish 😛

So let come to point, I wanted to add some buttons that will give me option to add custom class name so that I can format the text well. Same thing can be done via Visual editor but you have to use a plugin named “Tinymce Advanced” which helps to add more advance buttons like styles(class lists) and so on. But for HTML mode or for quick tags editor I didn’t such plugins.
Continue reading

WP Photo Album Plus Plus: WordPress Image Gallery

Most of the wordpress image gallery plugins can not make me happy. NExtgen is too much heavy, then I got another wordpress plugin “WP Photo Album Plus” developed by J.N. Breetvelt, a.k.a. (OpaJaap). R.J. Kaplan developed WP Photo Album 1.5.1 and then J.N. Breetvelt extended it with new features. Really I like this simple but powerfull gallery plugin. But something I didn’t like which I am trying to modify and releasing for every body so that I can get more ideas from other and even this modification can be done to main plugin too. Though my modification is not done yet! But why not I share my last modification and explain what I have done upto now 🙂
Continue reading

Adding My posts sub menu for posts section in wordpress

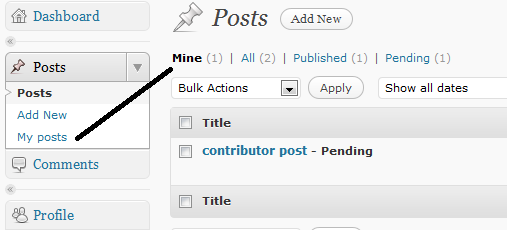
Let me explain the situation. Suppose you have contributor access to wordpress. If you go to posts page in admin panel that list all posts   and here you are not author of all posts.  you will see the url like
[code language=”php”]edit.php?post_type=post&all_posts=1[/code] and All( total post number here). There will be another menu named Mine(Current user post number). All link is default. So we can make nother submenu of posts in admin section for Mine link directly. Let me show you the few lines code.
[code language=”php”]add_action(‘admin_menu’, ‘manchu_myposts’);
function manchu_myposts()
{
if (function_exists(‘add_submenu_page’))
{
//$parent, $page_title, $menu_title, $access_level, $file, $function = ”
add_submenu_page(‘edit.php’,’My Posts’,’My posts’, 1, ‘edit.php?post_type=post&author=’.get_current_user_id());
}
}[/code]
You can copy-paste above code in your theme functions.php file and it will show a new sub menu in posts ectin as My posts. Multi user blog users can get easily link for his/her posts.
myposts
it’s just a easy way to make personal posts link for any user have access at leas contributor. Access level 1 belongs to contributor..

Update: 15-09-2011

While working on a project I got a tips from stackoverflow wordpress site about showing only specific author’s posts in author mode.
[code language=”php”]
function cb_posts_for_current_author($query) {
global $pagenow;

if( ‘edit.php’ != $pagenow || !$query->is_admin )
return $query;

if( !current_user_can( ‘manage_options’ ) ) {
global $user_ID;
$query->set(‘author’, $user_ID );
}
return $query;
}
add_filter(‘pre_get_posts’, ‘cb_posts_for_current_author’);
[/code]

thank you