আসুন ওয়ার্ডপ্রেসের ড্যাশ বোর্ড পরিস্কার করি

ওয়ার্ডপ্রেসের এডমিন প্যানেলে লগিন করলেই একগাদা বক্স এসে হাজির হয়। যদিও স্ক্রিন অপশন থেকে সেগুলো সহজে তাড়ানো যায় কিন্তু যদি এমন হয় এডমিন নিজেই ড্যাশবোর্ড পরিস্কার করে রেখে দিলেন নতুন সদস্যের জন্য। তবে এই পরিস্কার এর কাজটা আমরা করবো সামান্য কিছু পিএইচপি কোডিং করে।

ধাপ একঃ প্রথমে আপনার থীমের functions.php ফাইলে এ ২টি ফাংশন লিখতে হবে। মনে রাখবেন প্লাগিন এর কোডগুলো চাইলে functions.php ফাইলেও লেখা যায়। তাহলে শুরু করা যাকঃ
[code language=”php”]
//Define the function which unsets the boxes
function remove_dashboard_widgets() {
global $wp_meta_boxes;
myprint_r($wp_meta_boxes);
/*
//unset($wp_meta_boxes[‘dashboard’][‘normal’][‘core’][‘dashboard_right_now’]);
# Remove plugins feed
unset($wp_meta_boxes[‘dashboard’][‘normal’][‘core’][‘dashboard_plugins’]);
unset($wp_meta_boxes[‘dashboard’][‘side’][‘core’][‘dashboard_plugins’]);
# Remove "WordPress News"
unset($wp_meta_boxes[‘dashboard’][‘normal’][‘core’][‘dashboard_primary’]);
unset($wp_meta_boxes[‘dashboard’][‘side’][‘core’][‘dashboard_primary’]);
unset($wp_meta_boxes[‘dashboard’][‘normal’][‘core’][‘dashboard_secondary’]);
unset($wp_meta_boxes[‘dashboard’][‘side’][‘core’][‘dashboard_secondary’]);
# Remove incoming links feed
unset($wp_meta_boxes[‘dashboard’][‘normal’][‘core’][‘dashboard_incoming_links’]);
unset($wp_meta_boxes[‘dashboard’][‘side’][‘core’][‘dashboard_incoming_links’]);

unset($wp_meta_boxes[‘dashboard’][‘side’][‘core’][‘dashboard_recent_drafts’]);
unset($wp_meta_boxes[‘dashboard’][‘normal’][‘core’][‘dashboard_recent_comments’]);
unset($wp_meta_boxes[‘dashboard’][‘side’][‘core’][‘dashboard_quick_press’]);
unset($wp_meta_boxes[‘dashboard’][‘normal’][‘core’][‘events_dashboard_window’]);
*/
}
// Now hook in to the action
add_action(‘wp_dashboard_setup’, ‘remove_dashboard_widgets’, 20, 0);

//better print_r function taken from
//http://stackoverflow.com/questions/1386331/php-print-r-nice-table
function myprint_r($my_array) {
if (is_array($my_array)) {
echo "<table border=1 cellspacing=0 cellpadding=3 width=100%>";
echo ‘<tr><td colspan=2 style="background-color:#333333;"><strong><font color=white>ARRAY</font></strong></td></tr>’;
foreach ($my_array as $k => $v) {
echo ‘<tr><td valign="top" style="width:40px;background-color:#F0F0F0;">’;
echo ‘<strong>’ . $k . "</strong></td><td>";
myprint_r($v);
echo "</td></tr>";
}
echo "</table>";
return;
}
echo $my_array;
}

[/code]
Continue reading

Adding custom article submission form in joomla

In joomla registered user can submit article from front end. Today I am going to show how we can create new/custom view for article submission form. Here we need to go some technical steps. So let’s make a plan what we are going to do:

  1. Create new view
  2. Add custom option for that view via xml configuration
  3. Adding new menu with the new custom view
  4. Edit a core file to make this happen.

Create new view

To create a new view(view of MVC model used in joomla) at first copy paste the two files(form.php and form.xml) and rename as form2.php and form2.xml from directory components/com_content/views/article/tmpl.

Now modify the code for form2.php
Continue reading

Show/Hide comment status text in wordpress

I am again confused if my post title is perfect or not 🙁 So let me explain, sometimes we disable comment for any post or page and at last the text shows “Comments are closed” or something else in different ways. But in commercial projects we need to follow some good design where in some posts or pages we may need to enable comment or not. So, let’s put a trick in theme to show the comment text(comment status in more smart way)

In latest wordpress version the loop is in the loop.php file in the theme folder. So for comment we will get this line

[code language=”php”]
<?php comments_template( ”, true ); ?
[/code]

But how about we put

[code language=”php”]
<?php if($post->comment_status == "open"){comments_template( ”, true );} ?>
[/code]

That means if comment is off then we will not show any text like “Comments are closed” . I strongly believe this trick will make the design clean in some condition 😛

Thank you

Loading only component in joomla

I am not sure if my post title is perfect about what I want to express 😛 , let me clear. When we hit any link in joomla that must load any component with modules, header, footer … etc so many things. But what we need to do  if we want to load only the component part ? Ok if still you are not clear, then go to your template index.php file and check what you do with the following line

[code]<jdoc:include type="component" />[/code]

Yes I am talking about how we can load only the component with any link that the above line does. let you are in a link in your site for com_content, for me now I am in that link in my local test site. http://localhost/jtest/index.php?option=com_content&view=category&layout=blog&id=1&Itemid=50

If I go to the link I see full site. Ok now if I modify the url by appending &tmpl=component at end
http://localhost/jtest/index.php?option=com_content&view=category&layout=blog&id=1&Itemid=50&tmpl=component

I see only the component part. Please try yourself. This is how we can just show the component part. If you check your template folder there is a file named component.php which actually shows if component only link is opens. If that file is missing in your template then find in the system template folder. Also there are another two template files for error.php and offline.php which shows the error page and site offline mode page.

Now let me discuss when you may need to load the component only part. Let’s you want to show something via joomla native popup window, like you want to make popup login you can do this trick. Once I wrote a article about how to make modal (popup window) using joomla native modal javascript library.

Example: go to my joomla demo site  http://idea52.com/old/ click the feedback button, it will load the com_contact component in joomla native modal window.

Thank you.

How to Insert custom Quicktags into the WordPress Editor

WordPress has two type of editor, one is visual/wysiwyw that is tinymce or replace with other such editors and another is HTML editor that is we call quick tag editor. Today, I want to write something about how to add custom quick tags or custom buttons. I search about it in google and most guides to edit core quick tag javascript file. But I don’t like that and I made my own hack in my own way, though experts may think it’s childish 😛

So let come to point, I wanted to add some buttons that will give me option to add custom class name so that I can format the text well. Same thing can be done via Visual editor but you have to use a plugin named “Tinymce Advanced” which helps to add more advance buttons like styles(class lists) and so on. But for HTML mode or for quick tags editor I didn’t such plugins.
Continue reading

Adding custom generator tag in joomla

Joomla creates a generator meta tag automatically. If you view source of your joomla site you can search for meta tag “generator”. The default generator tag looks like
[code]
<meta name="generator" content="Joomla! 1.5 – Open Source Content Management" />
[/code]
We can modify this generator tag and also can put option in our custom joomla template to change this meta tag to site name or something different. so let’s start 🙂

In you template index’s file header tag you can write a line like bellow

[code language=”php”]
<?php
$this->setGenerator("your custom generator name");
$this->setGenerator(""); // you can leave that as blank too
?>
[/code]

We can set a option in template

in template index.php file

[code language=”php”]
<?php
$myconfig = new JConfig();
$mysitename = $myconfig->sitename;
?>
<?php
if($this->params->get(‘removegeneratortag’) == "yes"):
// Remove the generator meta tag
$this->setGenerator($mysitename);
endif;
?>
[/code]

in params.ini file add extra line
removegeneratortag=yes

in templateDetails.xml file

[code language=”xml”]
<params>
<param name="removegeneratortag" type="list" default="yes" label="Remove Joomla Generator Tag" description="Remove or disable joomla generator tag from head tag for security reason">
<option value="yes">Yes</option>
<option value="no">No</option>
</param>
</params>
[/code]

before

[code]"</install>"'[/code]

tag

you are done. I think now you can add/customize in your own way as you need. If you don’t know how to modify the above code then don’t try 😛

Thank you

Adding vertical fixed feedback button

update: 06.09.2010
Wana use as wordpress or joomla plugin ? then buy from my official website

Downloads

For Joomla
For WordPress

The Story

If you still didn’t notice, please check again there is a vertical feedback button in my blog , right side. So, sometimes people asks me how to do that ,,, any one can read the source code or having debug tool like firebug for firefox can see the source code and add in his own site. But max time, it’s true that we don’t want to learn by reading or google about any problem, we just ask other to get ready made solution. Even we don’t write in forums about our problems …. grr…

So here is answer of the those question, “How I added the vertical feedback button?”

I know how html works and how css works , I know where to edit in wordpress theme. So many days ago I saw that in a site and copied the source code and image and added in my site 😛
I am showing for default wordpress theme tweentyten and all paths shown bellow are windows style as windows is my primary os.

Step1: Copy this image to your wp-contentthemestwentytenimages folder first.

Step2: Open style.css file from wp-contentthemestwentyten dir and ready to add some css code 🙂
Step3: In the file style.css file at last line add the following css codes
Continue reading

Adding My posts sub menu for posts section in wordpress

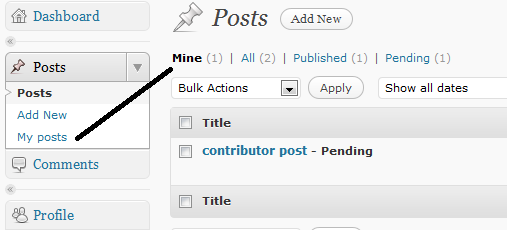
Let me explain the situation. Suppose you have contributor access to wordpress. If you go to posts page in admin panel that list all posts   and here you are not author of all posts.  you will see the url like
[code language=”php”]edit.php?post_type=post&all_posts=1[/code] and All( total post number here). There will be another menu named Mine(Current user post number). All link is default. So we can make nother submenu of posts in admin section for Mine link directly. Let me show you the few lines code.
[code language=”php”]add_action(‘admin_menu’, ‘manchu_myposts’);
function manchu_myposts()
{
if (function_exists(‘add_submenu_page’))
{
//$parent, $page_title, $menu_title, $access_level, $file, $function = ”
add_submenu_page(‘edit.php’,’My Posts’,’My posts’, 1, ‘edit.php?post_type=post&author=’.get_current_user_id());
}
}[/code]
You can copy-paste above code in your theme functions.php file and it will show a new sub menu in posts ectin as My posts. Multi user blog users can get easily link for his/her posts.
myposts
it’s just a easy way to make personal posts link for any user have access at leas contributor. Access level 1 belongs to contributor..

Update: 15-09-2011

While working on a project I got a tips from stackoverflow wordpress site about showing only specific author’s posts in author mode.
[code language=”php”]
function cb_posts_for_current_author($query) {
global $pagenow;

if( ‘edit.php’ != $pagenow || !$query->is_admin )
return $query;

if( !current_user_can( ‘manage_options’ ) ) {
global $user_ID;
$query->set(‘author’, $user_ID );
}
return $query;
}
add_filter(‘pre_get_posts’, ‘cb_posts_for_current_author’);
[/code]

thank you