Hello guys hope you are fine, didn’t write any blog for many days. Ya I was really busy with work and had sick of high blood pressure(… hei I am not too old, but some months left to be 26!). I have changed my life style already.. left meat, egg and sometimes fish…. Trying to be vegetarian … ha ha. Trying to sleep early and rise early 🙂 ya that’s manchu’s every day now ….
Let’s come to my blog post title “How to add extra fields in joomla registration and profile”. I was searching for solution about this but most common solution was put extra fields as joomla user meta tag. Don’t know about this ? Go to edit any user from admin panel then check right side… there are some option to choose language, timezone etc…. they are called ‘user meta’ in joomla. I tried how to hack core how to do that… don’t you like to change joomla core files ? what to do when you need to do that as a client’s requirement and if client doesn’t care about changing core files …. heh heh. So let me show you how you can add extra fields in joomla registration and profile changing core files. Hei I have tried to change less as much as possible, really!
Note: all file paths are windows style !
List of files need to edit/touch
libraries\joomla\database\table\user.php it’s the class file tor user table/user object
Let we need to put two extra fields like phone and website, let’s these fields as optional. So we need to initialize two var as string.
find the follow lines and then need to put before that [any php programmer will get easily but I am trying to write for all!]
[code language=”php”]
/**
* @param database A database connector object
*/
function __construct( &$db )
[/code]
now put the follow lines before above lines or near line 116
[code language=”php”]
/**
* some extra fields like name
*
* @var string
*/
var $phone = null;
var $website = null;
[/code]
again,
Open,
libraries\joomla\libraries\joomla\user\user.php
After line 124, add the following code
[code language=”php”]
/**
* some extra fields like name
*
* @var string
*/
var $phone = null;
var $website = null;
[/code]
Yes we are 50% done already.
Now use your phpmyadmin to add alter your user table. Please don’t ask me how to work with phpmyadmin !
[code language=”sql”]
ALTER TABLE jos_users ADD phone varchar(255) DEFAULT ” AFTER password;
ALTER TABLE jos_users ADD website varchar(255) DEFAULT ” AFTER phone;
[/code]
Please take care about your table prefix. my table prefix. If you table prefix is something else like mysite then your user table will be like mysite_users and the sql code will be like this
[code language=”sql”]
ALTER TABLE mysite_users ADD phone varchar(255) DEFAULT ” AFTER password;
ALTER TABLE mysite_users ADD website varchar(255) DEFAULT ” AFTER phone;
[/code]
Now go to administrator\components\com_users\views\user\tmpl
open file form.php and put the following lines after line 132 … just add as new row in table
[code language=”php”]
<tr>
<td width="150" class="key">
<label for="phone">
<?php echo JText::_( ‘Phone’ ); ?>
</label>
</td>
<td>
<input type="text" name="phone" id="phone" class="inputbox" size="40" value="<?php echo $this->user->get(‘phone’); ?>" />
</td>
</tr>
<tr><td width="150" class="key">
<label for="website">
<?php echo JText::_( ‘Website’ ); ?>
</label>
</td>
<td>
<input type="text" name="website" id="website" class="inputbox" size="40" value="<?php echo $this->user->get(‘website’); ?>" />
</td>
</tr>
[/code]
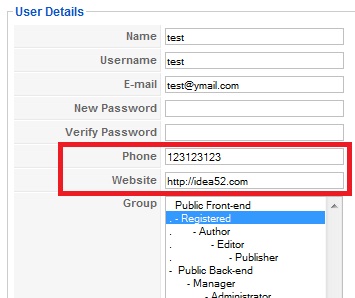
Seems joomla doesn’t allow output overirde for admin component ! If that was possible then we didn’t need to change core file but put this view file in template folder. I will show you how to do that in front end uesr component. But before that Let me show you how it will look after the above changes done properly.

Now we need to do some changes for front end. Please go to components\com_user\views\register\tmpl
and now open file default.php for edit
After line 73 , after the password verify row … add these lines
[code language=”php”]
<tr>
<td height="40">
<label id="phonemsg" for="phone">
<?php echo JText::_( ‘Phone’ ); ?>:
</label>
</td>
<td>
<input type="text" name="phone" id="phone" size="40" value="<?php echo $this->escape($this->user->get( ‘phone’ ));?>" class="inputbox" maxlength="50" /> *
</td>
</tr>
<tr>
<td height="40">
<label id="websitemsg" for="website">
<?php echo JText::_( ‘Website’ ); ?>:
</label>
</td>
<td>
<input type="text" name="website" id="website" size="40" value="<?php echo $this->escape($this->user->get( ‘website’ ));?>" class="inputbox" maxlength="50" /> *
</td>
</tr>
[/code]
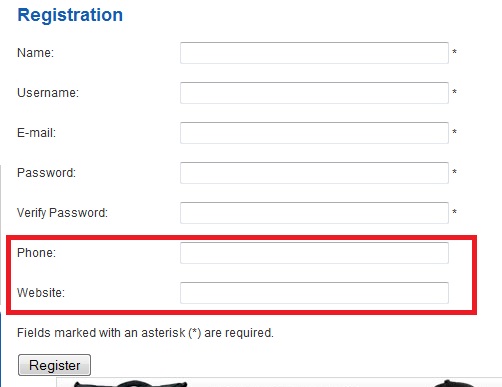
Let me show you how this will l;ook in registration page if every thing is done properly.

I told you , we can do the same changes in view for front end component without changing core files. Copy that default.php file from components\com_user\views\register\tmpl and now go to your current template folder. Let’s it’s default rukhmilkway … Check there is a folder name html in it. if your custom template doesn’t have any html folder then create one. now go to the html folder and create a folder named “com_user” (if there is no folder with this name as some custom template use output override and use same method for styling) and create a folder in com_user folder as named “register” and paste the default.php file in it. Actually you need to copy all the php files from components\com_user\views\register\tmpl to templates\{your custom template name here}\html\com_user\register
Isn’t this fun ?
Oh we have left one thing still. If we want to give user to edit their profile from front end ? We need to edit one view file again. But this this time we will not change core file in view but at first copy the view from file front end component to template folder … follow the way I shown just now.
So according to default template go to templates\rhuk_milkyway\html\com_user\user (create folder “user” in com_user same way) and copy all the php files(two files default.php and form.php) from components\com_user\views\user\tmpl …. I think it’s now easy …
Open file form.php and edit/put new lines after 70(it’s just a end of a if-end condition)
[code language=”php”]
<tr>
<td width="120">
<label for="phone">
<?php echo JText::_( ‘Phone’ ); ?>:
</label>
</td>
<td>
<input class="inputbox" type="text" id="phone" name="phone" value="<?php echo $this->escape($this->user->get(‘phone’));?>" size="40" />
</td>
</tr>
<tr>
<td width="120">
<label for="website">
<?php echo JText::_( ‘Website’ ); ?>:
</label>
</td>
<td>
<input class="inputbox" type="text" id="website" name="website" value="<?php echo $this->escape($this->user->get(‘website’));?>" size="40" />
</td>
</tr>
[/code]
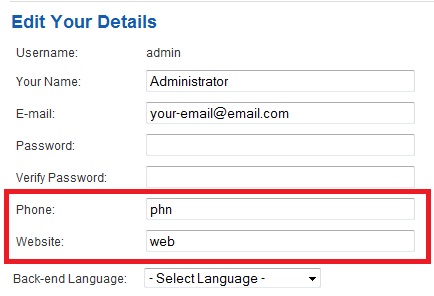
Let me show another screenshot how the edit details from front end looks

that’s all. Let me know if you have any problem.
How do I add extra fields to joomla! 2.5? There are no form.php available in above said location. Help me please.
i was able to get look of the contact detail on the backend when save i’m getting error about it does not recognize the tty column i worked with db i can find any db extension in joomala anyone knows where in joomala these db files are located ps thank for your help in advance
great article.
This is rily helpful. However i want to know about changing username to email address. so that users login with their email instead of username. can you help using mod_login in joomla 1.5
Cool man
really nice to understood.
OOPS…
It seems that it keeps the old value even after updating the value inside the user form in the admin area of joomla.
example:
I have a front end component that displays the value of the new field, at this time the value is 2. If i enter a new value in the admin form such as 5, and then i go to the front end of joomla and refresh the component view it still displays the old value of 2. Even though when i check the database i can see that my value is updated and is also displaying correctly inside the form field itself in the joomla back-end.
I really hope this makes sense 😉
Cheers
John
Ok so its worked out,
If you change a value of the jos_user table via back end admin, you need to log out and log back in on front end for that change to take effect. This is because joomla has a session table that keeps a record of your values in it.
Hope that helps someone one day 😉
Jonnypixel ( Over and Out )
Hi,
great tutorial. I have one problem though, inside a component view this dosent work.
// no direct accessdefined('_JEXEC') or die('Restricted access');
$user =& JFactory::getUser();
$uid = $user->get('id');
$access = $user->get('accessLevel');
I am failing to get the accessLevel value from the jos_user table
Please help 🙂
PS: I have followed every step correct and can see my new form field and can also update it but i just can not retrieve it for my custom component.
And thanks again for this great tutorial.
Jonnypixel
I think the problem is fixed. For some reason i had to logout and login again for the new variable to take effect? this question by the way was related to calling the new var via a custom front end component view 🙂
Awesome, awesome. I faced some issue with checkbox, but could solve after some tries. 😉
<input class="inputbox" type="checkbox" name="hasweb" id="hasweb" size="40" value="reallyhasweb" user->get('hasweb') == "reallyhasweb" ? 'checked="checked"' : ''; ?>" />Thanks dada for this nice tuto.
You are genius! awesome!
I added extra two fields on my 4 websites, and those form work fine. This time I got problem with front end form view. I added two extra fields but does not appear on front end. Finally I researched online, and found you. OMG! your tutorial is amezing! My custom template has the \default.php\ file that needs to add those two extra fields. After adding two fields on \/templates/yourtemplate/html/com_user/register/default.php\, it was works as a charm!
Thanks again Manchumahara!
Thanks for the post – seems that its going to help as a starting point for some changes that i need to do in the registration process.
Is it just me or the path librariesjoomlalibrariesjoomlauseruser.php does not exists and it should be: librariesjoomlauseruser.php ?
thank s for your post
how to add an multi line check box in registration page and these check box are retrieve the value from a table
Thanks, this tutorial is great! But I have a preoccupation.
How about adding a field that is for uploading a file to a specific directory?
i can not save my data’s in front end.. but it’s working fine in admin side..
not working for me
What if i want the added fields to be visible in user listing at the back-end?
What should I do to add new column at the backend site>usermanager?
just figured it out how to do it…
I’ve modified this file: /administrator/components/com_users/views/users/tmpl/default.php 🙂
You can override the admin com_users component’s output the usual way. Just place the administrator\components\com_users\views\user\tmpl\*.* in your administrator\templates\[admin_template_name]\html\com_users\user
Make your changes to form.php and you are done!
You can override the admin com_users component’s output the usual way. Just place the administrator\components\com_users\views\user\tmpl\*.* in your administrator\templates\\html\com_users\user
Make your changes to form.php and you are done!
Ops, regarding item b), don’t forget to set all your extra vars around the line 486 on the same file mentioned above (controler.php) like the other vars $yourvar = $user->get(‘yourvar’);
Great article! Just what I was looking for. I need some further info.
a) I want to add a dropdown list in php instead of the regular inputtext. I need for example a dropdown list where the user can select: “Master, Senior, Junior”. What is the PHP code for that? Would you post the code or create or point an article about it?
b) I want do add the fields I’ve added also in the e-mail that Administrator receives informing the new user resitration. (Those Send_Message_Active with %s), but were are those $name, $email, $username, to add the $.. for the fields we have added? In sum, how to add the new fields in the e-mail to admins?
Thanks in advance.
Just to share if somebody else is in the same need, the item b) I got to solve by changing the controller.php at components/com_user and adding the vars around the line 537 $message2 =… and changing also the file that writes the e-mail text to the admin in your language: xx-XX_com_user.ini
Now I just need to solve the item a).
i used this taturial but could not recive any email from local host..how to solve it?