Hello guys hope you are fine, didn’t write any blog for many days. Ya I was really busy with work and had sick of high blood pressure(… hei I am not too old, but some months left to be 26!). I have changed my life style already.. left meat, egg and sometimes fish…. Trying to be vegetarian … ha ha. Trying to sleep early and rise early 🙂 ya that’s manchu’s every day now ….
Let’s come to my blog post title “How to add extra fields in joomla registration and profile”. I was searching for solution about this but most common solution was put extra fields as joomla user meta tag. Don’t know about this ? Go to edit any user from admin panel then check right side… there are some option to choose language, timezone etc…. they are called ‘user meta’ in joomla. I tried how to hack core how to do that… don’t you like to change joomla core files ? what to do when you need to do that as a client’s requirement and if client doesn’t care about changing core files …. heh heh. So let me show you how you can add extra fields in joomla registration and profile changing core files. Hei I have tried to change less as much as possible, really!
Note: all file paths are windows style !
List of files need to edit/touch
libraries\joomla\database\table\user.php it’s the class file tor user table/user object
Let we need to put two extra fields like phone and website, let’s these fields as optional. So we need to initialize two var as string.
find the follow lines and then need to put before that [any php programmer will get easily but I am trying to write for all!]
[code language=”php”]
/**
* @param database A database connector object
*/
function __construct( &$db )
[/code]
now put the follow lines before above lines or near line 116
[code language=”php”]
/**
* some extra fields like name
*
* @var string
*/
var $phone = null;
var $website = null;
[/code]
again,
Open,
libraries\joomla\libraries\joomla\user\user.php
After line 124, add the following code
[code language=”php”]
/**
* some extra fields like name
*
* @var string
*/
var $phone = null;
var $website = null;
[/code]
Yes we are 50% done already.
Now use your phpmyadmin to add alter your user table. Please don’t ask me how to work with phpmyadmin !
[code language=”sql”]
ALTER TABLE jos_users ADD phone varchar(255) DEFAULT ” AFTER password;
ALTER TABLE jos_users ADD website varchar(255) DEFAULT ” AFTER phone;
[/code]
Please take care about your table prefix. my table prefix. If you table prefix is something else like mysite then your user table will be like mysite_users and the sql code will be like this
[code language=”sql”]
ALTER TABLE mysite_users ADD phone varchar(255) DEFAULT ” AFTER password;
ALTER TABLE mysite_users ADD website varchar(255) DEFAULT ” AFTER phone;
[/code]
Now go to administrator\components\com_users\views\user\tmpl
open file form.php and put the following lines after line 132 … just add as new row in table
[code language=”php”]
<tr>
<td width="150" class="key">
<label for="phone">
<?php echo JText::_( ‘Phone’ ); ?>
</label>
</td>
<td>
<input type="text" name="phone" id="phone" class="inputbox" size="40" value="<?php echo $this->user->get(‘phone’); ?>" />
</td>
</tr>
<tr><td width="150" class="key">
<label for="website">
<?php echo JText::_( ‘Website’ ); ?>
</label>
</td>
<td>
<input type="text" name="website" id="website" class="inputbox" size="40" value="<?php echo $this->user->get(‘website’); ?>" />
</td>
</tr>
[/code]
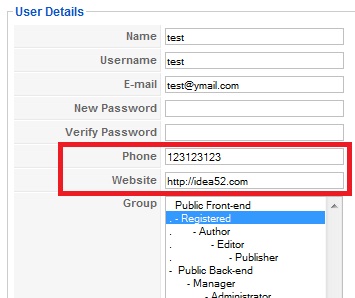
Seems joomla doesn’t allow output overirde for admin component ! If that was possible then we didn’t need to change core file but put this view file in template folder. I will show you how to do that in front end uesr component. But before that Let me show you how it will look after the above changes done properly.

Now we need to do some changes for front end. Please go to components\com_user\views\register\tmpl
and now open file default.php for edit
After line 73 , after the password verify row … add these lines
[code language=”php”]
<tr>
<td height="40">
<label id="phonemsg" for="phone">
<?php echo JText::_( ‘Phone’ ); ?>:
</label>
</td>
<td>
<input type="text" name="phone" id="phone" size="40" value="<?php echo $this->escape($this->user->get( ‘phone’ ));?>" class="inputbox" maxlength="50" /> *
</td>
</tr>
<tr>
<td height="40">
<label id="websitemsg" for="website">
<?php echo JText::_( ‘Website’ ); ?>:
</label>
</td>
<td>
<input type="text" name="website" id="website" size="40" value="<?php echo $this->escape($this->user->get( ‘website’ ));?>" class="inputbox" maxlength="50" /> *
</td>
</tr>
[/code]
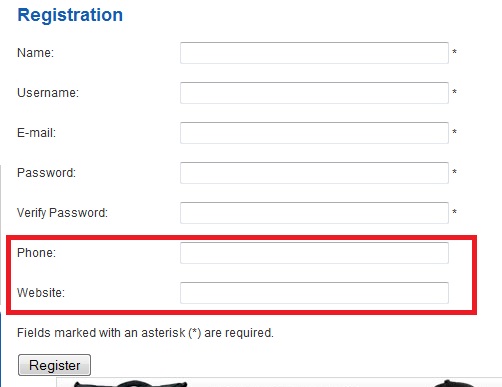
Let me show you how this will l;ook in registration page if every thing is done properly.

I told you , we can do the same changes in view for front end component without changing core files. Copy that default.php file from components\com_user\views\register\tmpl and now go to your current template folder. Let’s it’s default rukhmilkway … Check there is a folder name html in it. if your custom template doesn’t have any html folder then create one. now go to the html folder and create a folder named “com_user” (if there is no folder with this name as some custom template use output override and use same method for styling) and create a folder in com_user folder as named “register” and paste the default.php file in it. Actually you need to copy all the php files from components\com_user\views\register\tmpl to templates\{your custom template name here}\html\com_user\register
Isn’t this fun ?
Oh we have left one thing still. If we want to give user to edit their profile from front end ? We need to edit one view file again. But this this time we will not change core file in view but at first copy the view from file front end component to template folder … follow the way I shown just now.
So according to default template go to templates\rhuk_milkyway\html\com_user\user (create folder “user” in com_user same way) and copy all the php files(two files default.php and form.php) from components\com_user\views\user\tmpl …. I think it’s now easy …
Open file form.php and edit/put new lines after 70(it’s just a end of a if-end condition)
[code language=”php”]
<tr>
<td width="120">
<label for="phone">
<?php echo JText::_( ‘Phone’ ); ?>:
</label>
</td>
<td>
<input class="inputbox" type="text" id="phone" name="phone" value="<?php echo $this->escape($this->user->get(‘phone’));?>" size="40" />
</td>
</tr>
<tr>
<td width="120">
<label for="website">
<?php echo JText::_( ‘Website’ ); ?>:
</label>
</td>
<td>
<input class="inputbox" type="text" id="website" name="website" value="<?php echo $this->escape($this->user->get(‘website’));?>" size="40" />
</td>
</tr>
[/code]
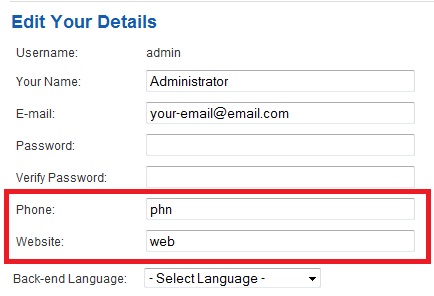
Let me show another screenshot how the edit details from front end looks

that’s all. Let me know if you have any problem.
Hi friend,
Awsome and easy tutorial. I was just wondering if you can post on how to enable new fields to be shown in User Manager.
Thnx,
Hello my friend,
I did all the changes, but I don´t know why in the Frontend Registration Page I can not see the two fields I added, could you help me please?
দাদা, আগের থেকে কিছুটা দ্রুত লোড হচ্ছে কিন্তু চোখে পড়ার মত তেমন উন্নতি হয় নি।
it's not working!! wtever changes i make in componentscom_userviews
egister mpldefault.php nothing happened!!
please help!
how can i make these actions in a module or something?
i want to install it and be ready to go.
please help
How to inset phone and web address into database (I want to insert they into #_users table)
WOW That was very helpful!!!! thank u a lot …i was in many sites searching for the solution.!
Helpful article, thanks!
I do have an important question though, I am a Joomla noob so please bear with me, where would I be able to perform checks on these fields? I would like to ensure that a specific field is only alphaNumeric or only an integer. I know I can use javascript but that's not dependable and can cause security concerns.
Thanks!
Jeremy
Thank you for the tutorial, really great!!!!!!! 😀
Dear Manchu! you have done great job, but i have a problem to use this one , actually i have tried to do same thing which is working for joomla default themes, but when i make default theme another one like IT Veranda that particular extra field now showing in that theme , i m so confused what is the problem, please do me the favor if you know something about it. Thanks
Thanks for the post, enjoyed it.
Thank you for the tutorial, well described and structured. It was very helpful to me.
excellent tutorial, helped me alot in adding custom fields
Wow, good how to. very very thanks
I have a question. How do I add a choice between private and company?
If the user clicks on company check the form to the company with corporate data.
You know you help me?
Really great and simple tutorial. Thanks man
There is a way to complete those functionalities without changing core files.
In my opinion, datas need to be collected (using JRequest) and added to the database (using JDatabase) with a "user plugin".
Whatever, your method for changing the View using the template is the good one 😉
Really helpful and easy to follow article.
I have tried adding combo box but it was not saved. How to achieve this?
Also I want to add multi select check list boxes.
Please help me.
Very Thanks! Long time looking for some simple way to add fields w/o to install a whole community component …just to add one more field!
Great work Manchu! This is very helpful. Any plans to allow the new fields to be visible in the user manager table to gain a bird's eye view of who has or hasn't completed the additional information?
Really great Manchu Da…..that was really helpful…
<blockquote cite="comment-9297">
Sumit Saha: Really great Manchu Da…..that was really helpful…
Thank you Sumit.